Make Your Own BJD
Firstly, it's not as easy as you might think to sculpt and cast your own doll, and it's definitely not cheaper. My suggestion would be to go back to the first chapter and re-read the section on how BJDs are made before deciding that you want to make your own. Secondly, casting can be dangerous since resin is partially composed of Isocyanate. It can also be expensive once you take into account the tools and waste, especially if you have no experience in casting; not to mention the cost of the supplies themselves. You also need a clean area that is free of moisture and humidity and has a fairly steady temperature in which to work, (72-76 degrees is best.)
Hopefully you have some experience with both sculpting and casting but if not, the best way to learn is by doing. Get some clay and play with it for a while before setting down to do your actual doll parts. It would be even better if you could try small amounts of several different kinds of clay before settling on the one you'd like to use. There are a lot of options and you aren't obligated to use any single one. Some people even carve their doll prototypes in wood, polystyrene or other materials instead of sculpting. I have tried to include some of these links too. Test casting some smaller resin parts first is also a good idea before you go full scale and helps to work the kinks out of any system you use so you don't have as much waste; it also makes the entire process less costly.
Last of all, sculpting and casting your own doll can be very rewarding. If you can make it past some of the more technical problems that can arise and the (pretty high) cost and end up with a complete doll of your own creation, then major kudos to you. It's definitely not easy, but it is quite the accomplishment. On this page, you can follow along with the process as I make my own 60cm BJD and show you the real numbers (and work!) involved.
DESIGNING YOUR DOLL
Let's start by designing your doll. The first step is to decide a basic size for your doll. Do you want it to be able to wear standard size clothes and shoes? Start by drawing it life size (It does not need to be detailed yet!) and comparing it to your dolls (or measurements if you don't have dolls yet). Use this paper draft as you would a doll, bend it at the knees, elbows and other joints. Does the proportion work? Are the limbs the right length? This gives you a chance to work out some of the kinks before you get started with more expensive materials. If you are happy with your rough draft, begin to fill in the details like what sort of joints you will need. Use a second piece of paper to draw any extra or unseen pieces such as joints and swivels. Now start to separate these pieces and add details. Once you are happy with your "paper doll" blueprint, get ready to sculpt!
Tip-> To check symmetry, fold them in half!
Total cost for Design: $0.00
(I had paper and pencils already)
Total time for Design: ?? hrs
insert photo of paper draft here
SCULPTING YOUR DOLL
Now you're going to need some clay to make your Original from. Many dollmakers like Sculpey polymer clay (a bake-able clay), Apoxie Sculpt (an epoxy or 2-part clay) or LaDoll paperclay. Each have their own pros and cons. Try them all to be sure which you like best and then get a LOT of it. Most of all, remember, mistakes are going to happen. That doesn't mean you aren't good at this...just human. :)

insert photo of sculpt here
When you're ready to work, make sure to keep your blueprint nearby so you can easily check scale and detail placement as you work. You need to preserve this blueprint until all the pieces are completed and sculpting is messy work! If you can laminate them, put them underneath plexi-glass or in ziploc baggies...do it!
To complete your doll and be sure it's ready for molding, string it gently and see if it can hold a pose or stand. If not, adjust the joints until it can. If your Original can't stand, neither will your reproduction. When you are happy with it, you're ready to make molds of each part.
Total cost for Sculpting: $???
Total time for Sculpting: ??? hrs
A Note about Shore Hardness
Shore is a measurement of how hard a material is. The higher the number, the harder the material.
Silicones are usually measured on the Shore A scale and Resins are measured on the Shore D scale.
Photo from ArtMolds.Com, click on it to be taken to their website and learn more about shore.

DESIGNING YOUR DOLL
Let's start by designing your doll. The first step is to decide a basic size for your doll. Do you want it to be able to wear standard size clothes and shoes? Start by drawing it life size (It does not need to be detailed yet!) and comparing it to your dolls (or measurements if you don't have dolls yet). Use this paper draft as you would a doll, bend it at the knees, elbows and other joints. Does the proportion work? Are the limbs the right length? This gives you a chance to work out some of the kinks before you get started with more expensive materials. If you are happy with your rough draft, begin to fill in the details like what sort of joints you will need. Use a second piece of paper to draw any extra or unseen pieces such as joints and swivels.
insert photo of paper draft here
MOLDING YOUR DOLL
Now you're going to need some silicone to make your mold. It's up to you to decide which silicone serves your purposes best. Here are some aspects to consider when choosing a silicone:
- Shore: Harder silicones reproduce detail better but are harder to get casts ( & Originals!) out of.
- 1A:1B mixtures (by volume) These are the easiest because all you need is two equal amounts.
- Platinum-Cure Silicones will last longer and reproduce detail better than Tin-cure but cost more.
- Pot Life How long is the time you have to mix it and pour it before it sets?
- Set Temp Does it set at room temp?
- Degas Does it require degassing? If so, do you have a Vacuum Chamber to do it with?
- Set Time Do you need to be able to cast the same day or can you wait 6 hours for it to set?
Unless you are making a very small doll, I suggest the Gallon size which averages about $200 for platinum-cure or $100 for tin-cure. Once you begin making molds, you will better be able to judge how much you need. You can often buy silicone on the same sites you buy your resin from so check there for links.
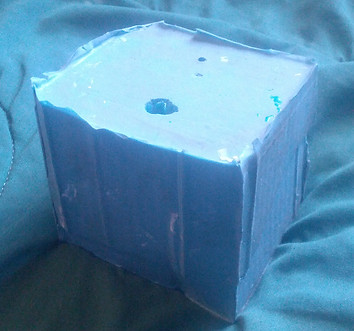
Once you've chosen a silicone, you will need something to build your mold box. WED clay is invaluable in this process. You'll also need a wall material. I use Legos, but some people plexiglass or cardboard to define the outside edge of the mold. For ball jointed dolls, you often need to make two or three part molds in order to reproduce the hollow interiors. To begin, set up your walls, making sure to leave a space of 1-2 fingers around all edges of the part. Fill the entire bottom of the mold with WED clay. Build up the clay to hold your part slightly elevated from the clay "floor" of the mold. Now is the time to add keys to the extra space around your part. Keys are small, simple shapes and/or lines that will fit together to ensure your mold fits together properly, every time. You can see these lines, balls and squares on every mold on this page.
Do not skimp on the space around your part! This makes your mold stronger and last longer. Thin mold walls lead to warped casts and torn molds, so make them thick. This is especially important in molds that you intend to use many times.

WED Clay is sulfur free and is used in moldmaking because clays with sulfur in them will cause silicone not to set. It stays soft, so you can use it again and again.
Why Tin-Cure? If you only need to make one or two copies, tin-cure is probably the (cheaper!) answer for you. It is especially good for "junk casts" (a draft prototype that you intend to refine further before reproduction).
The next step is to place vents and the sprue. For this I use a very small amount of WED clay to affix straws to my Original. I like to place these where I think air is most likely to get trapped. I use the biggest straw as my sprue or 'pour hole'. The other, smaller straws will make thinner channels for air bubbles to escape. Adding vents is vital to getting as few bubbles as possible. The more molds you make and use, the better you will get at placing these vents. Do not worry if you need to remake a mold because of misplaced vents or sprue. It happens to all of us. ;)
Once you have your mold boxes set up around the part you wish to mold, mix your silicone as the instructions for your brand direct you to and then pour them into your molds. You will want to pour from higher up, which gives the air bubbles more chance to escape before they end up in your mold. Once it's filled, gently tap the mold box to help release remaining bubbles. If your silicone needs degassed, do that now, before it sets. Wait the entire set time before attempting to remove your Original part or attempting to make the other part of the mold.
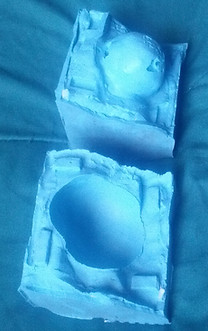
To make two part molds, allow your first mold section to set completely; Then, coat exposed silicone with Vaseline before mixing and pouring the other side. If you do not use Vaseline, they will set into one whole block instead of two parts. Once all your mold parts are fully set, wash them to remove dust, being sure to rinse thoroughly. Allow to dry completely before using it to cast your reproduction.

This image clearly illustrates the 2 part mold making process.
Dark Blue = Original
Light Blue = WED clay/walls
Orange = Silicone
Both of these photos are the same mold. This two part mold fits together to make headcaps. Note the large sprue used to fill the mold and the smaller vent hole. When you take it apart, you can see the "keys" or raised/indented shapes that fit together to make sure the mold is perfectly closed.
(You can also see on the outside of the mold, the small tags and lines that Legos make on your molds!)
Total cost for Molding: $???
Total time for Molding: ??? hrs
Total cost for Molding: $???
CASTING YOUR DOLL
info on casting
insert photo of resin casting here
CASTING YOUR DOLL
Once you have a clean and complete mold, you are ready to cast your reproduction. You'll need to choose a resin that suits your needs. You'll be deciding based mostly on the same factors that helped you choose your silicone, to find the polyurethane resin that is best for you.
- Shore: Harder silicones reproduce detail better but are harder to get casts ( & Originals!) out of.
- 1A:1B mixtures (by volume) These are the easiest because all you need is two equal amounts.
- Platinum-Cure Silicones will last longer and reproduce detail better than Tin-cure but cost more.
- Pot Life How long is the time you have to mix it and pour it before it sets?
- Set Temp Does it set at room temp?
- Degas Does it require degassing? If so, do you have a Vacuum Chamber to do it with?
- Set Time Do you need to be able to cast again the same day or can you wait 6 hours for it to set?
There is also an additional factor:
- Color Do you want to make a pure white doll? Perhaps a clear one? Maybe a fantasy color instead? Different resins cure to different colors and some take additives like color, better.
If you want to put any additives in your resin, you'll need those as well. Examples are UV protection, colors or fillers. Your resin supplier should be able to inform you which of these additives will work with the resin that you have chosen.

Total cost for Self Casting: $???
Total time for Self Casting: ??? hrs
If you don't want to do it yourself, there is another option: professional casting. Several companies offer this, but it isn't cheap either. I still recommend making a resin cast or two of your Original and sending one of those instead of your Original. Most of the casting companies are in Asia and do not speak a lot of English; You need to use short, clear sentences to convey exactly what you want. The most notable professional casting company is Haru, and they list all of their fees, minimums and prices clearly on their site.
Total cost for Pro Casting: $???
Total time for Pro Casting: ??? hrs
SELLING YOUR DOLL
The most important factor in selling your creations is having a direct way for customers to purchase it; whether it's an Etsy store or a full on website, people need to be able to buy your doll somewhere.
Once you have that set up, you'll want to advertise it somewhere like Den of Angels or Collectasy, so your potential customers can learn about your new doll.
Total cost for Marketing: $???
Total time for Marketing: ??? hrs